Dynu's System Monitoring & DNS Failover service helps you monitor critical services
from multiple geographic locations and automatically respond when downtime is detected.
One powerful failover action is enabling a Web Redirect for a domain
when a monitor goes down — automatically redirecting visitors to a fallback URL
or a specific IP and port until your service is restored.
A Web Redirect failover action automatically activates or deactivates a Web Redirect rule configured on your domain in response to a monitor state change. Web Redirect rules are disabled by default and must be enabled either manually or via a failover action.
Web Redirect supports two types of redirection:
To configure failover actions that enable and disable Web Redirect when a monitor changes state, follow these steps.
 Step 1
Log into the control panel, go to DNS Failover
and click on
Monitors.
Select the monitor you want to configure by clicking on its name.
DNS Failover
and click on
Monitors.
Select the monitor you want to configure by clicking on its name.
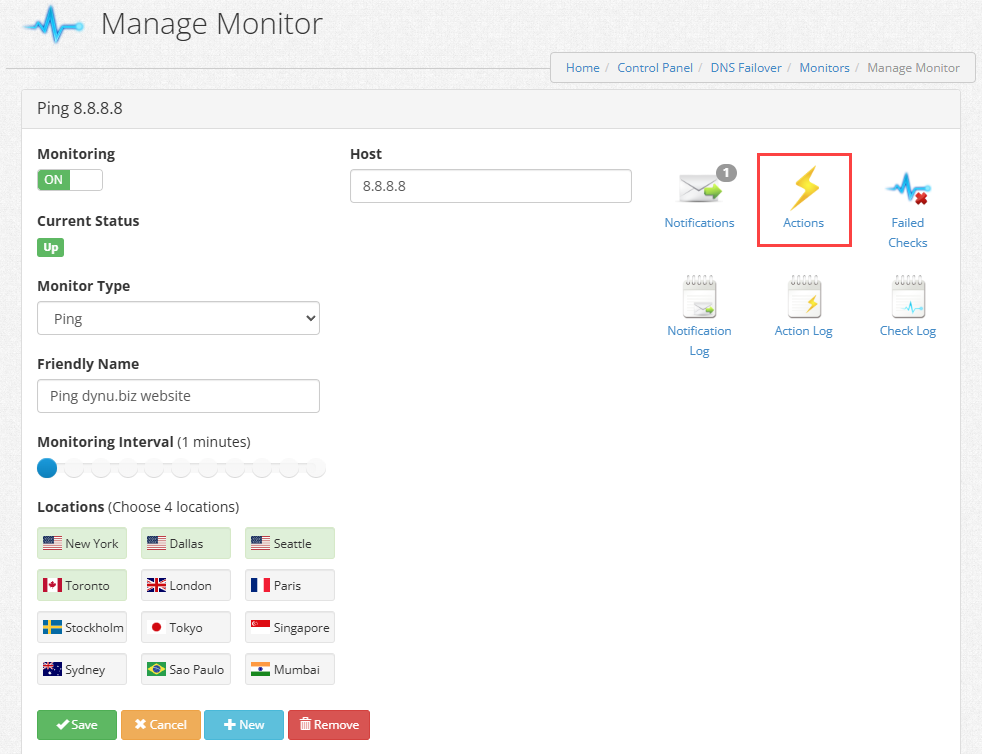
In the Manage Monitor page, click the Actions button to open the Actions page for this monitor.
 Step 2 — Add a "Down" action to enable Web Redirect
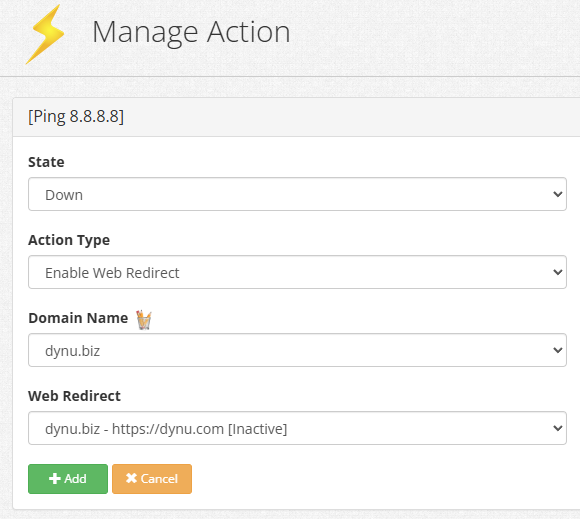
On the Actions page, click the + Add button to add a new failover action. Configure the following fields:
State Select Down. This action will trigger when the monitor detects that your service is unavailable.
Action Type Select Enable Web Redirect. This will activate the Web Redirect rule configured for your domain, redirecting visitors away from the unavailable service.
Domain Name Select the domain you want the redirect to apply to (e.g., dynu.biz).
Web Redirect Select the Web Redirect rule to activate. The dropdown will list the redirect rules configured for the selected domain, shown as inactive by default (e.g., dynu.biz - https://dynu.com [Inactive]). When this action fires, the selected rule will be enabled automatically.
Click + Add to save this action.
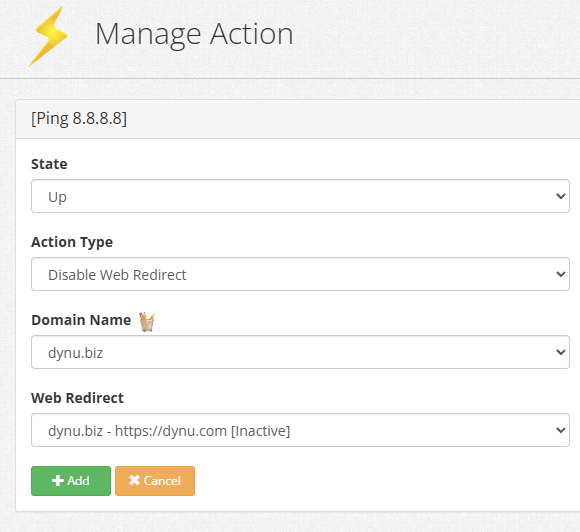
 Step 3 — Add an "Up" action to disable Web Redirect
Click the + Add button again to add a second failover action for when your service recovers. Configure the following fields:
State Select Up. This action will trigger when the monitor detects that your service has recovered.
Action Type Select Disable Web Redirect. This will deactivate the Web Redirect rule, restoring normal DNS resolution for your domain.
Domain Name Select the same domain used in Step 2 (e.g., dynu.biz).
Web Redirect Select the same Web Redirect rule used in Step 2 (e.g., dynu.biz - https://dynu.com [Inactive]).
Click + Add to save this action.
 Step 4 — Verify your configuration
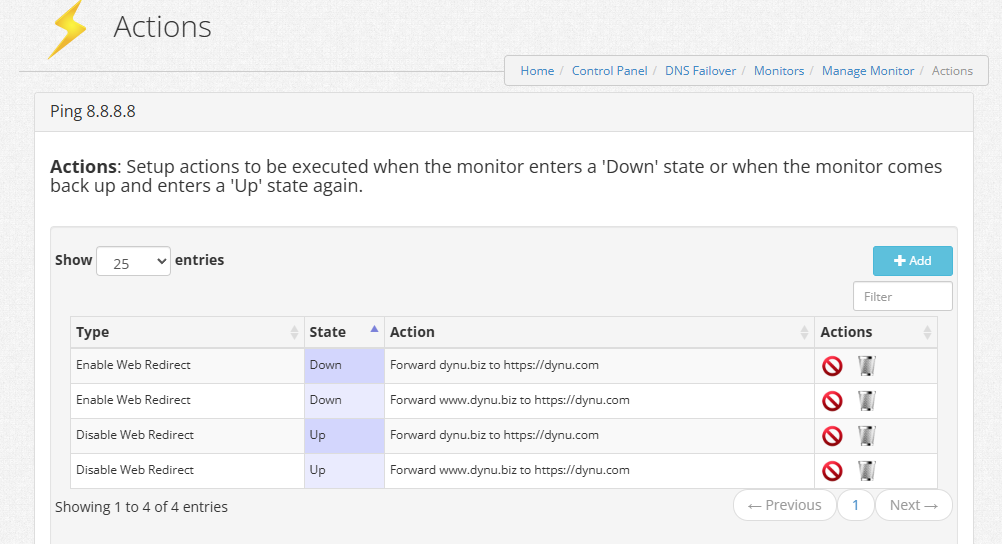
Once both actions are saved, they will appear in the Actions list. For example, if you configured two domains (dynu.biz and www.dynu.biz), you will see four entries in total:
Your monitor will now:
What is a Web Redirect Failover Action?
A Web Redirect failover action automatically activates or deactivates a Web Redirect rule configured on your domain in response to a monitor state change. Web Redirect rules are disabled by default and must be enabled either manually or via a failover action.
Web Redirect supports two types of redirection:
- Redirect to a URL — Forward visitors to a fallback web address, such as a status page or a mirror site (e.g., https://dynu.com).
- Redirect to an IP and port — Forward traffic to a specific IP address and port number, useful for pointing to a backup server.
How to configure a Failover Action for Web Redirect?
To configure failover actions that enable and disable Web Redirect when a monitor changes state, follow these steps.
Log into the control panel, go to
In the Manage Monitor page, click the Actions button to open the Actions page for this monitor.
On the Actions page, click the + Add button to add a new failover action. Configure the following fields:
State Select Down. This action will trigger when the monitor detects that your service is unavailable.
Action Type Select Enable Web Redirect. This will activate the Web Redirect rule configured for your domain, redirecting visitors away from the unavailable service.
Domain Name Select the domain you want the redirect to apply to (e.g., dynu.biz).
Web Redirect Select the Web Redirect rule to activate. The dropdown will list the redirect rules configured for the selected domain, shown as inactive by default (e.g., dynu.biz - https://dynu.com [Inactive]). When this action fires, the selected rule will be enabled automatically.
Click + Add to save this action.
Click the + Add button again to add a second failover action for when your service recovers. Configure the following fields:
State Select Up. This action will trigger when the monitor detects that your service has recovered.
Action Type Select Disable Web Redirect. This will deactivate the Web Redirect rule, restoring normal DNS resolution for your domain.
Domain Name Select the same domain used in Step 2 (e.g., dynu.biz).
Web Redirect Select the same Web Redirect rule used in Step 2 (e.g., dynu.biz - https://dynu.com [Inactive]).
Click + Add to save this action.
Once both actions are saved, they will appear in the Actions list. For example, if you configured two domains (dynu.biz and www.dynu.biz), you will see four entries in total:
- Enable Web Redirect — Down — Forward dynu.biz to https://dynu.com
- Enable Web Redirect — Down — Forward www.dynu.biz to https://dynu.com
- Disable Web Redirect — Up — Forward dynu.biz to https://dynu.com
- Disable Web Redirect — Up — Forward www.dynu.biz to https://dynu.com
Your monitor will now:
- Automatically enable the Web Redirect when the monitor goes Down, redirecting visitors to your fallback destination.
- Automatically disable the Web Redirect when the monitor comes back Up, restoring normal access for your visitors.