
Step 1: Set up VNC Server on the remote Windows computer
Some users contacted us saying that their Windows computer does not come with Windows Remote Desktop by default and asked if there is an alternative. The answer is yes. There are many remote access applications on the market and among them there is VNC which is free for less than 5 remote devices.
You can first go to RealVNC and sign up for a free account by providing a valid email address. The email address and password will be used later when you set up the VNC server. After you sign up for the account, you can activate a Home subscription for free.
Then download and install VNC Connect on each remote computer you want to control. During the installation, you can keep all the default options, especially the 'Add An exception to the firewall for VNC Server' option needs to be enabled.
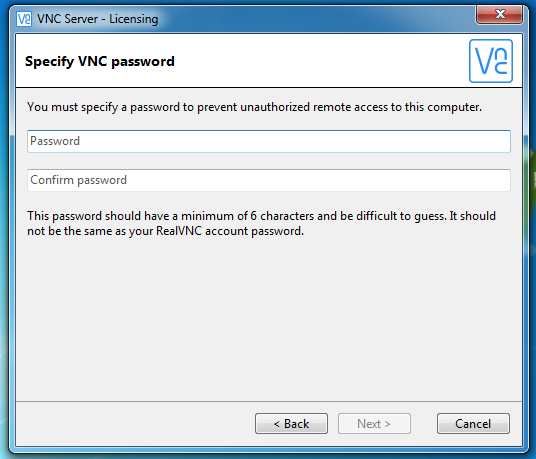
Once the application finishes installing, sign in to the VNC Server app using your RealVNC account credentials (email and password). After signing in, you will see a page asking you to specify a password for VNC Server. This is the password you will use every time when establishing a remote connection.
Step 2: Set up Port Forwarding (Port Translation) in the router
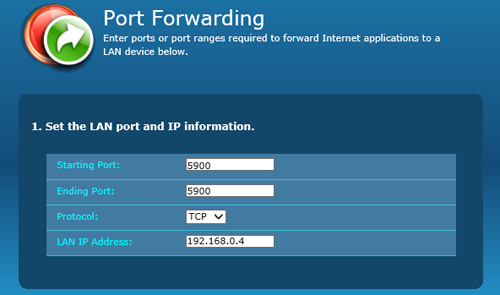
Please log into the router website (generally at http://192.168.1.1 or http://192.168.0.1) at the remote location and go into the 'Port Forwarding' section. Add a new 'Port Forwarding' rule for TCP port 5900 to be forwarded to the internal IP of your remote Windows computer. To get the internal IP address of the device, you may type ipconfig in "cmd.exe". It is usually in the form of "192.168.0.**" or "10.10.*.*".
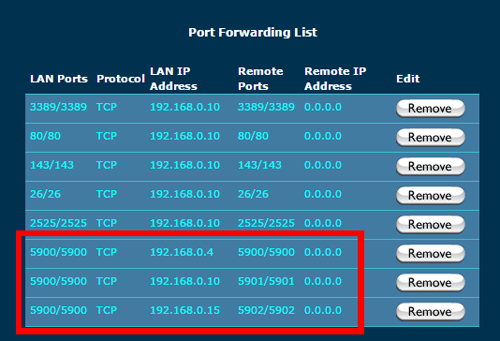
NOTE: If you need to connect to several machines behind the same router, you should set up port forwarding for all these machines. Let's suppose machine 1 has an internal IP 192.168.0.4, machine 2 has an internal IP 192.168.0.10, and machine 3 has an internal IP 192.168.0.15. We can set up different external ports for different machines as shown in the picture below.
To see if the port forwarding has been setup correctly, you can use our Port Check network tool to see if the corresponding port is open. If you get a "Success" response from the port check, then your network has been correctly set up.
STEP 3: Map your dynamic IP to a hostname
Internet service providers change your IP address on a regular basis, but with dynamic DNS you can keep your domain pointing at the current IP of your home server or other devices.
You may register a domain name of your own (yourdomain.com) and sign up for Dynu Dynamic DNS Service for it or use a free Dynu domain name (myhostname.dynu.com). You may refer to this Getting started tutorial for more information.
Download the appropriate client software and run it on the remote Windows computer to keep the hostname mapped to the remote dynamic IP. You may also set up the DDNS service in the router if the router supports it.
Step 4: Download and install VNC Viewer on your local computer
Depending on the operating system of the computer you are using, you may download the appropriate VNC Viewer here. Note that it should be installed on the computer that you use to connect to the remote Windows computer. We have already installed VNC server (VNC Connect) on the remote Windows computer in Step 1.
If the local device is Mac OS or iOS that has Safari browser, there is no need to install VNC viewer and you can simply type in vnc://myhost.dynu.com in the browser address bar to connect.
STEP 5: Use VNC Viewer to access your remote PC
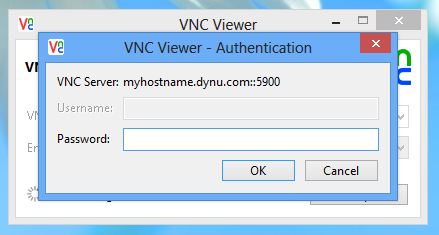
You should now be able to access your Windows computer remotely using myhostname.dynu.com from the internet via VNC Viewer.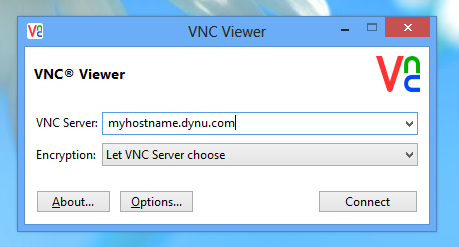
You will be prompted a window asking for a password, which is the VNC password we've set up on the remote Windows computer in Step 1.
NOTE: In the case of connecting several machines, for machine 1, you can use "myhostname.dynu.com:5900", for machine 2, you may use "myhostname.dynu.com:5901", and for machine 3, you may use "myhostname.dynu.com:5902".