Are you trying to run FTP, web, email services or connect remotely to your computer, DVR, webcam with a dynamic IP address? You can simply follow these steps to set up Dynu free dynamic DNS service so that you can run your servers at home even without a static IP address.
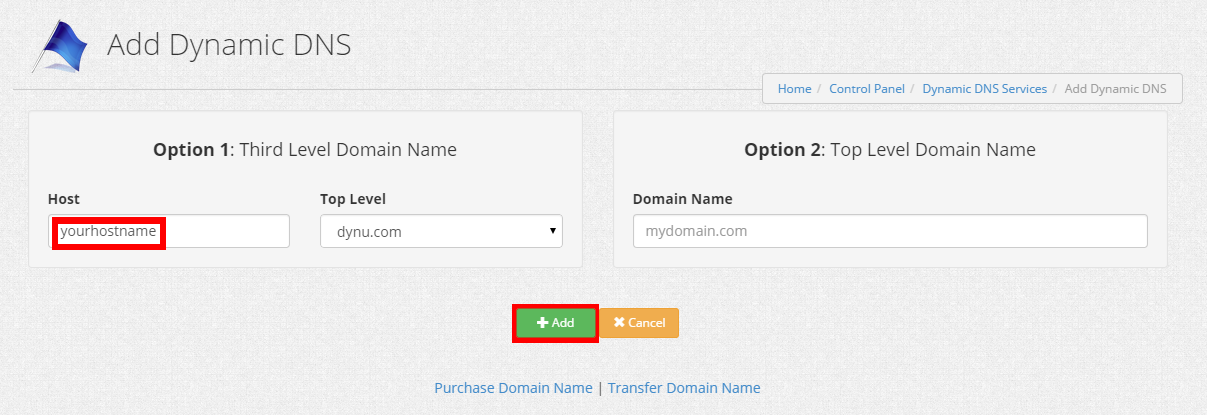
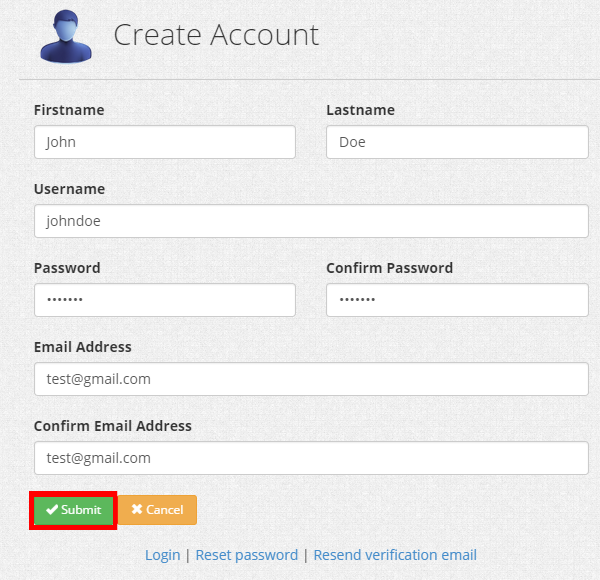
The first step is to sign up for an account with a free Dynu domain name here. Type in the hostname in "Third Level Domain Name" section and click "Add" button. Fill out the required information and create your account.


You will receive an email with a subject "Dynu Verification Email". Click the verification link in the email to verify your account.
If you cannot find the email in your inbox, it is possible it has been sent to you SPAM folder. It is important that you find the email and declare the sender out of SPAM list, for you will be receiving technical support emails through this account.
You have been given a free easy-to-remember Dynu hostname (yourhostname.dynu.com) which is used to connect to your server instead of complicated IP address.
For example, if you are trying to run a web server, and you want to connect to your server using a web browser, you would put http://yourhostname.dynu.com in the address bar. If you are trying to connect to your home computer from work, you could also use the hostname (yourhostname.dynu.com) to connect to your desktop remotely using software like Windows Remote Desktop. If you are trying to run an FTP server, you can either put the hostname directly into your FTP client or put ftp://yourhostname.dynu.com into the address bar of the web browser.
After logging into the control panel, you may configure your dynamic DNS service.
Download and install the appropriate client software. For Mac OS X users, you may install DDClient by referring to this page.
If your router allows Dynamic DNS configuration, you may skip using a client software and configure Dynu dynamic DNS service in the router to update your IP. Supported routers include DD-WRT, HUAWEI HG 533, ZyWALL-USG50, Linksys E3000 etc. Router configuration may be found here.
If you use a router to connect to the internet, you will need to make sure that it is configured to direct the appropriate traffic from the internet into the destination machine on your network. This is done using a router function called Port Forwarding. Common ports to forward are port 80 for a web server, port 25 for SMTP email, and port 3389 for Remote Desktop. In order to verify that your router is set up correctly, you may do a port check using our network tools.
If you have a firewall in place in your computer, you need to open the port on the firewall.
Step 6: Use the service
If you have done the configurations above properly, you can now run your services and address your machine using the host or domain you created! If you have any problems, you can check the FAQ section of our website or open a trouble ticket.
Step 1: Sign up for a free account
The first step is to sign up for an account with a free Dynu domain name here. Type in the hostname in "Third Level Domain Name" section and click "Add" button. Fill out the required information and create your account.


Step 2: Verify your account
You will receive an email with a subject "Dynu Verification Email". Click the verification link in the email to verify your account.
If you cannot find the email in your inbox, it is possible it has been sent to you SPAM folder. It is important that you find the email and declare the sender out of SPAM list, for you will be receiving technical support emails through this account.
Step 3: Log into control panel
You have been given a free easy-to-remember Dynu hostname (yourhostname.dynu.com) which is used to connect to your server instead of complicated IP address.
For example, if you are trying to run a web server, and you want to connect to your server using a web browser, you would put http://yourhostname.dynu.com in the address bar. If you are trying to connect to your home computer from work, you could also use the hostname (yourhostname.dynu.com) to connect to your desktop remotely using software like Windows Remote Desktop. If you are trying to run an FTP server, you can either put the hostname directly into your FTP client or put ftp://yourhostname.dynu.com into the address bar of the web browser.
After logging into the control panel, you may configure your dynamic DNS service.
Step 4: Make your domain name dynamic
Download and install the appropriate client software. For Mac OS X users, you may install DDClient by referring to this page.
If your router allows Dynamic DNS configuration, you may skip using a client software and configure Dynu dynamic DNS service in the router to update your IP. Supported routers include DD-WRT, HUAWEI HG 533, ZyWALL-USG50, Linksys E3000 etc. Router configuration may be found here.
Step 5: Configure your router
If you use a router to connect to the internet, you will need to make sure that it is configured to direct the appropriate traffic from the internet into the destination machine on your network. This is done using a router function called Port Forwarding. Common ports to forward are port 80 for a web server, port 25 for SMTP email, and port 3389 for Remote Desktop. In order to verify that your router is set up correctly, you may do a port check using our network tools.
If you have a firewall in place in your computer, you need to open the port on the firewall.
Step 6: Use the service
If you have done the configurations above properly, you can now run your services and address your machine using the host or domain you created! If you have any problems, you can check the FAQ section of our website or open a trouble ticket.
